PeepFactory Basics
The peep designer tool in RollerCoaster Tycoon 3 is used to manually create groups of peeps which visit your parks. You can use the peep designer to create families, couples, groups of coaster-crazed teenagers, or whatever groups of peeps you'd like. But you have to create the groups manually one at a time and it can be quite time consuming. PeepFactory allows you to automatically generate large numbers of groups of peeps and control the size of each group, the gender/age mix, the ride intensity preferences, and the peeps' appearances. You can download PeepFactory from here.

One of PeepFactory's main uses is to get more peeps to ride your rides. If you've played RCT3 very much then you've probably noticed that peeps often don't seem particularly interested in many of your rides. And if you've played RCT1 or RCT2 then you probably still have fond memories of long lines of peeps at most of your coasters. The main reason that RCT3 peeps don't seem to like rides as much as RCT1 and RCT2 is because of the way groups work. RCT3 peeps are often waiting around doing nothing until other members of their group complete something. A simple solution is to fill your park with individual peeps rather groups of peeps. Individual peeps spend much more time riding rides and no time waiting for members of their groups.
If all you want is peeps which spend more time riding rides then start up PeepFactory, click the Defaults button, and then click the Generate Peeps button. That will generate 2500 individual peep files. The next time you start up a park, when new peeps enter your park they will come from the peep files you just generated. Let the park run for a while and you will see the lines at your rides lengthen.
PeepFactory 101
PeepFactory can do more than just get peeps to ride your rides. It gives you complete control over the makeup of peep groups. Don't let all the tabs and controls scare you. It's not all that complicated. One of the common things you see in PeepFactory is a bunch of horizontal slider bars grouped together. By dragging these bars left and right you can control the likelihood that a particular attribute is generated. For example on the Main tab, there is a set of bars in the Select group percentages box. That set of bars allows you to control how many peeps are generated for each kind of peep group. By dragging the bars around you can control the kinds of groups of peeps that are generated. The percentages to the left of the bars show you how much of each attribute will be generated.
PeepFactory does not have an installer. Just download the .EXE file and run it. It doesn't create any directories or make any modifications to the registry. It does create a file called RCT3Shop.prm in the directory where you placed PeepFactory.exe. To uninstall PeepFactory just delete PeepFactory.exe and RCT3Shop.prm.
There are two basic kinds of peep groups: random groups and custom groups. Each peep in a random group is generated randomly so you only have general control over how they are generated. For example, if you generate a random group with two members and you've arranged for 50% to be male and 50% to be female, then approximately half of the peeps in these groups will be male and half will be female but you cannot guarantee that each group has one male and one female. Each member of the random group has a 50/50 chance of being male or female but random groups don't allow you to force one member to be male and one female. Custom groups allow you to have independent control over each member of the custom group. So you could generate custom groups which are always one male and one female by arranging for member 1 in the custom group to have 100% chance of being male and member 2 to have 100% chance of being female.
You control how a peep is generated by dragging slider bars, selecting values from drop down list, and selecting various options. All of those slider bars, options, etc. taken together are refered to as a member set. Member set is shorthand for the set of controls and options which determine what kind of peep is generated. A member set allows you to control the gender, age, ride intensity preference, and appearance of a peep. The specifics of the controls and options are described in detail below.
All random peeps are controlled by a single member set. There is only one set of controls for gender, age, etc. for all random peeps. So if you adjust the random peep member set controls to generate half males and half females then that rule applies to all random peeps whether they are individuals or members of a random group. You can adjust the values of the random member set on the Gender/Age tab, the Intensity tab, and the Appearance tab. Each of those tabs has a Select member to edit control. The Select member to edit control selects which member set you are adjusting. To make adjustments to the random member set, go to the Select member to edit control, click the little down arrow button, and then select the Random group member entry from the drop down list. Then whatever changes you make to the controls on that tab will apply to all randomly generated peeps.
Custom groups allow you to control each member of the group indidually by having a separate member set for each member of the group. Member 1 in the custom group has its own member set. Member 2 has its own member set and so on for all members in the custom group. That allows you to control how each member is generated independently of the other members. There are six separate custom groups: custom group A to custom group F. There are six of them in case you want to keep track of more than one kind of custom group at the same time. You could use custom group A for teenage couples, custom group B for adult couples, and custom group C for familes of two adults and three children. Just pick an unused custom group and start adjusting it. Each member of each of those custom groups has its own member set. To adjust the controls for custom group A member 1, go to the Select member to edit control on the tab and set it to Custom group A member 1. Then the values you adjust affect only member 1 of custom group A. You can do that independently for each member of each custom group. Random groups are easier to set up because you only have to adjust one member set but custom groups give you individual control over each member.
For example, suppose you want to make a group which always has one teenage female and one teenage male. You need to do that by adjusting a custom group. The general steps to do that are as follows (the controls are described in more detail below):
- Choose an unused custom group to work with. For this example just use custom group A.
- Go to the Main tab.
- In the Select custom group sizes box set the Custom group A size to 2. This makes copies of custom group A contain 2 members.
- Drag the Select group percentages slider bars until Custom group A is 100%. This makes it generate only copies of custom group A.
- Enter the number of peeps you want to generate into the Number of peeps to generate box.
- Go to the Gender/Age tab.
- In the Select member to edit box select Custom group A member 1.
- Drag the Select gender/age percentage slider bars until the teenage male is 100%. This makes it generate only teenage males when it generates custom group A member 1.
- In the Select member to edit box select Custom group A member 2.
- Drag the Select gender/age percentage slider bars until the teenage female is 100%. This makes it generate only teenage females when it generates custom group A member 2.
- Click the Generate peeps button.
- Run RCT3 and watch the teenage couples enter your park!
If you would like to discuss PeepFactory in a forum then a good place is Atari RCT3 General Discussion forum.
If you find bugs please report them to the contact email address at the top of the page.
The Buttons At The Bottom Of The Window
Generate Peeps
Press this button to generate the peep files. The peep files generated are added to any existing peep files. The new files do not overwrite or delete any existing ones. As a result, it's okay to generate some peep files and then come back later and generate some more to add to the older ones.
Delete All Peeps
This deletes all files in the peeps directory. This includes files created by the peeps designer built into RCT3. The files are moved to the recycle bin so you can restore them if you decide that you shouldn't have deleted them. Note that if you have the Peeps directory on the main tab set to a different directory then all the files which end with ".txt" will be deleted from that directory whether they are RCT3 files or not.
Delete Factory Peeps
This deletes all peep files in the peeps directory which were created by PeepFactory. This will not delete peep files created by the peep designer built into RCT3.
Defaults
This sets all values in PeepFactory to default values. This can be handy if you've been fiddling with the controls and would like to start "from scratch" with the standard default values again.
Exit Program
This just exits the PeepFactory. The next time you start the program all the controls will be where you left them the last time you ran it.
The Main Tab

Number of peeps to generate
This is the total number of peeps to generate. In this case it will generate approximately 2500 peeps. If you generate only indidual peeps then it will generate 2500 individuals. If you generate groups of two peeps then it will generate 1250 groups of two. It may actually generate a slightly higher number of peeps to make sure that any groups are the right size.
Peeps directory
This is the directory which holds the peeps files. PeepFactory automatically sets this directory to the default directory used by standard RCT3 installations. Sometimes you may want to generate peep files and temporarily store them in a separate directory so this control allows you to select that directory.
Include Soaked! options
Putting a check in this box enables the options used by the Soaked! expansion pack. This checkbox is unchecked by default so you should put a check in this box if the peeps you are generating are to be used with Soaked!. Peeps which are generated with this box unchecked can be used with Soaked! but you won't be able to control the extra Soaked! features like swimsuits and the extra cheat codes.
Use oldest member of random groups as leader
Put a check in this box to pick the oldest member of random groups as the leader. If this box is unchecked then it randomly picks the leader of random groups. Custom groups always use member 1 as their leader.
Select group percentages
This bunch of slider bars controls how many peeps of each group are generated. In this example, approximately 50% of the peeps (1250) will be random individuals, 32% (800) will be members of random groups of four (200 random groups of four), 18% (450) will be members of custom A groups (225 custom A groups of two).
Select custom group sizes
These controls select the number of peeps for each kind of custom group. In this example all groups of type custom A will always have two peeps. Custom F groups always have eight peeps and the other kinds of custom groups have four peeps.
Control last name sharing
This allows you to arrange for all members in a custom group to have the same last name. You can use this to create families. In this example, all members of a custom A and custom D group will have the same last name. Groups of the other custom kinds will have random last names.
The Gender/Age Tab

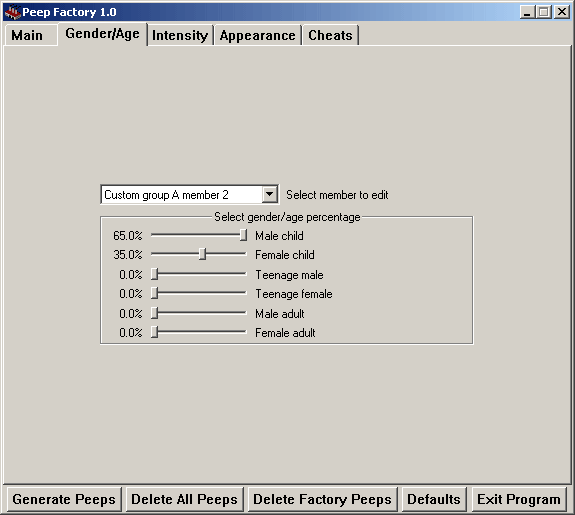
Select member to edit
This control selects which member set you are editing. In this case it's the member set for member 2 of custom group A. If you select All members then the adjustments you make to the gender/age values will apply to all member sets. All members is useful when you don't want to go to the trouble of assigning the gender/age values separately for each member set.
Select gender/age percentage
This bunch of slider bars controls how many of each gender/age are generated. In this case 65% of the peeps generated for member 2 of custom group A will be male children and 35% will be female children.
The Intensity Tab

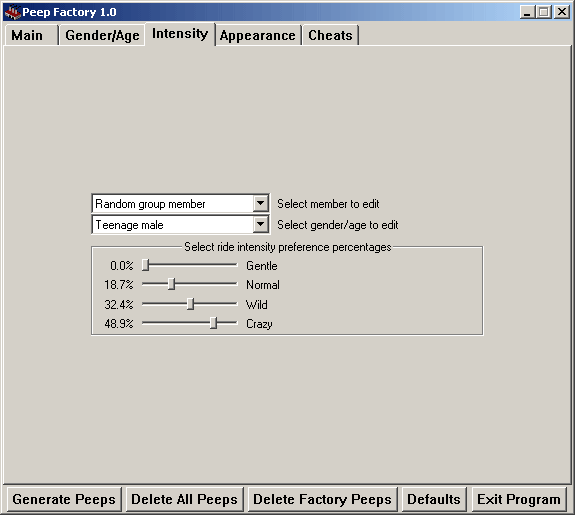
Select member to edit
This control selects which member set you are editing. In this case it's the member set for random groups. If you select All members then the ride preference intensity values which you select apply to all member sets.
Select gender/age to edit
This control selects which gender/age you are editing within the member set in Select member to edit. You adjust the ride preference intensity values independently for each gender/age. That allows you to do things like have children prefer gentle rides and have teenagers prefer crazy ones.
Select ride intensity preference percentages
This set of slider bars allows you to select the kind of ride intensity prefered by a peep. This controls what kind of rides the peep prefers. In this case, all random teenage males prefer crazy rides the most, wild rides quite a bit, normal rides a little, and they don't like gentle rides.
The Appearance Tab

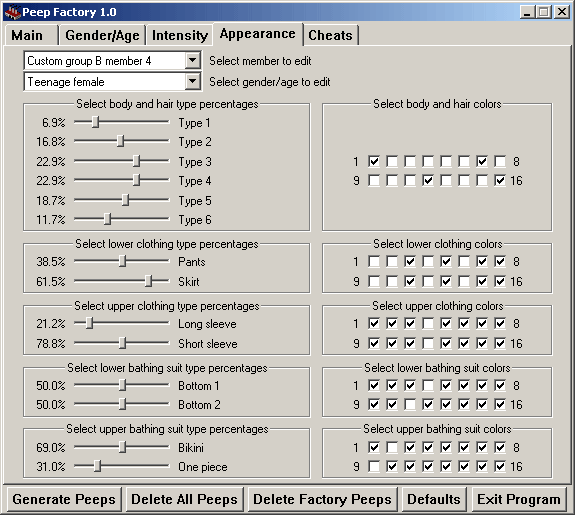
Select member to edit
This control selects which member set you are editing. In this case it's the member set for member 4 of custom group B. If you select All members then the appearance values which you select apply to all member sets.
Select gender/age to edit
This control selects which gender/age you are editing within the member set in Select member to edit. This allows you to edit the appearance independently for each gender/age.
Select body and hair type percentages
This bunch of slider bars controls the body and hair type for this gender/age in the selected member set. There are six different looks to choose from.
Select body and hair colors
This selects the colors for the body and hair. There are sixteen different colors. Putting a check in a box enables that particular color. In this example it will generate only colors 1, 7, 12, and 16.
Select lower clothing type percentages
This bunch of slider bars controls the type of lower part of the clothing (pants or skirts). The actual types of clothing depend on the age/gender.
Select lower clothing colors
This controls the possible colors for the lower clothing.
Select upper clothing type percentages
This bunch of slider bars controls the type of upper part of the clothing (shirt). The actual types of clothing depend on the selected gender/age.
Select upper clothing colors
This controls the possible colors for the upper clothing.
Select lower bathing suit type percentages
This bunch of slider bars controls the type of lower part of the bathing suit. The actual types of clothing depend on the gender/age. This only appears if the Soaked! options are enabled on the Main tab.
Select lower bathing suit colors
This controls the possible colors for the lower bathing suit. This only appears if the Soaked! options are enabled on the Main tab.
Select upper bathing suit type percentages
This bunch of slider bars controls the type of upper part of the bathing suit. This only appears for teenage females and adult females and only appears if the Soaked! options are enabled on the Main tab.
Select upper bathing suit colors
This controls the possible colors for the upper bathing suit. This only appears appears if the Soaked! options are enabled on the Main tab and you are editing teenage females or adult females.
The Cheats Tab

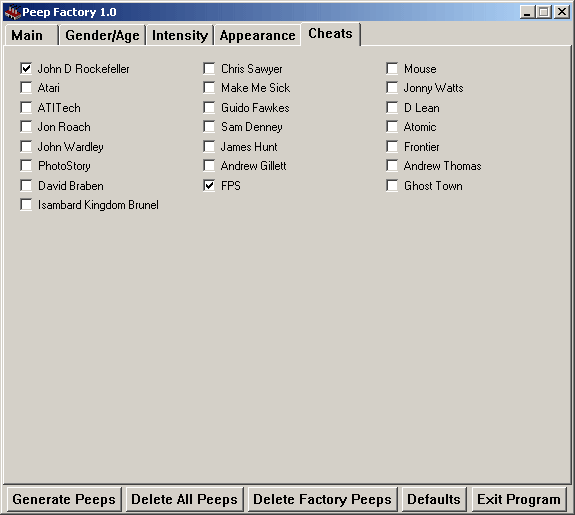
Cheat codes in RCT3 work by changing the name of a peep to the cheat code. For example, you change the name of a peep to "FPS" to enable a frame rate counter. The cheats also work when a peep named "FPS" created by PeepFactory enters the park. You can arrange for a peep to be named with the cheat code by putting a check in the box to the left of the cheat code. In this case it's going to generate a peep named "John D Rockefeller" and another named "FPS". This method for using cheat codes is convenient but has a couple of problems. When the "cheat peeps" enter the park they will automatically enable the corresponding cheat. And PeepFactory generates the cheat peeps first so they are the first peeps to enter the park. But if you save the game and then later reload the game, RCT3 does not reenable the cheats for the cheat peeps which are already in the park. It only enables the cheats when they first enter the park or when you manually rename a peep. The other problem is that RCT3 loads the peep files in the order that the files appear in the peeps directory. The first peeps file is the first set of peeps to enter the park. As a result, to assure that the cheat peeps are the first to enter the park you must delete any existing peeps files before generating the cheat peeps. The cheats tab is included here despite its limitations because cheat peeps can be convenient when you're testing a park.

